Using Paragraph Styles In Your Word Processor
Date: 2020-08-28
Paragraph styles can save teachers time and effort and help them create more effective, more accessible materials.
I think most people understand that word processors (MS Word, Google Docs, LibreOffice Writer, et. cetera) are not typewriters. But, I also think many users do not understand just how much their word processor software can do for them. Perhaps the biggest feature that people would be using, if they understood it, is styles.
Styles let you set the formatting for a character, a paragraph, a frame, a table, a page, etc. and then apply that formatting with a simple mouse click or keyboard shortcut. For teachers, I think the most important styles to start using are paragraph styles. Just using those will save you a lot of time and help you make better documents faster.
What are paragraph styles?
Paragraph styles let you change the all aspects of the
formatting for paragraphs based on what kind of paragraph each
one is. Paragraph styles change line spacing and fonts; set
tabs and justification; and add or change borders and colors,
to name just the most common things.
Common paragraph
types include:
- title
- subtitle
- headings (H1, H2, H3, for example)
- first-line indent (most body paragraphs)
- hanging indent — such as for works-cited pages and definition lists
- footnotes
- page header and footer
paragraphs
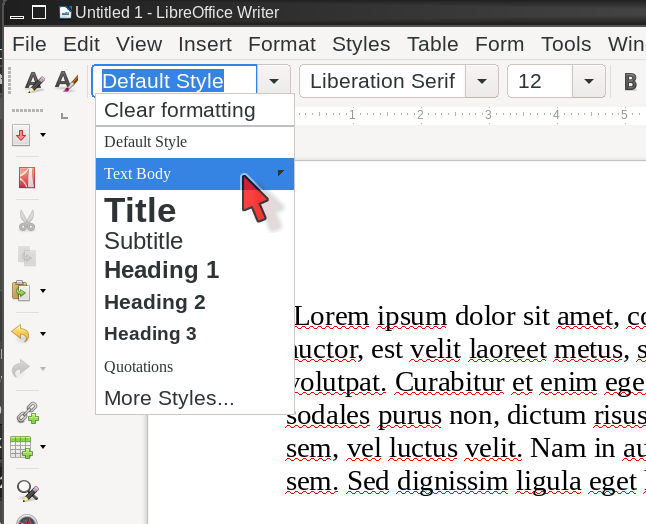
The picture below shows the Styles dropdown menu in
LibreOffice Writer, available on the main toolbar. Click on a
style to apply it to the current paragraph, or click
on More Styles
to open the Styles and Formatting
sidebar.

Most of the time, you simply put your cursor in the paragraph you want to change. Then, click on the paragraph style you want from either the dropdown menu (in LibreOffice Writer and Google Docs) or the ribbon (in MS Office). Your word processor will automatically apply the formatting information to the entire paragraph. There is no need to highlight the entire paragraph when you apply a style — by default paragraph styles affect the entire paragraph.
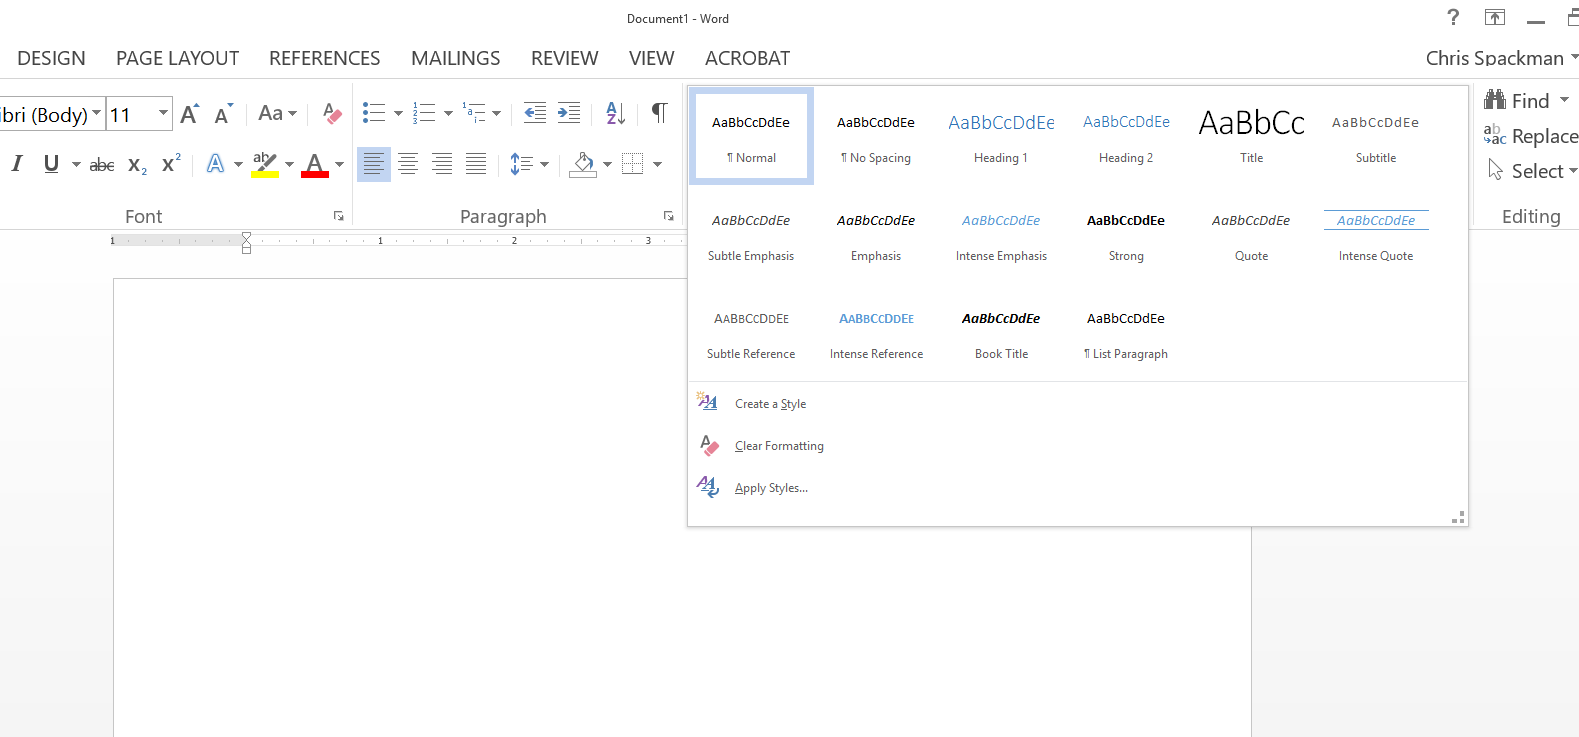
The picture show the Styles in the Ribbon in MS Word when
expanded.

In MS Office, you may have to expand the styles menu (as in
the picture above) to find the style you want because most are
hidden. Unlike other word processors, MS Word mixes paragraph
and character styles in the same menu. I'm not sure if I like
that idea, but I could probably get used to it. To be honest,
I've not seen many teachers who use any paragraph styles, much
less character styles. In my experience, educators who use MS
Office are more likely just using the bold
or italics
toolbar buttons, not strong
or emphasis
character styles. Mixing the character
styles with the paragraph styles does not seem to have done
much good, in other words.
Google Docs only offers a few styles (and only paragraph styles), so all are visible from the dropdown menu. LibreOffice Writer has a lot of styles, but the most common as well as all applied styles (styles in use in the current document) are shown in the dropdown menu.
Changing Style's Settings
To change the formatting of a style, you can right click on it
in the dropdown menu in LibreOffice Writer and select
Modify
. In Google Docs, you click the arrow to the
right of the style name in the dropdown menu, then
select Modify
. In MS Office, you can right click on the
style icon in the ribbon and select Modify
. Each brings
up a pop up menu with all the options for formatting
paragraphs, including tabs, spacing, font, etc. Google Docs
has the fewest options. LibreOffice and MS Office have similar
options. I personally find LibreOffice more logical and
consistent, but I have also been using it for about 20
years. If you have been using MS Office for 20 years, you have
my deepest sympathies. And, you probably think that MS
Office paragraph settings make more sense than those in
LibreOffice. (Often, intuitiveness
in software is a
function of how long you have been using the software.)
Pro Tip: If your software allows it, set the default paragraph settings in normal units (such as points, centimeters, and lines), and then set the rest in percentages. This allows you to change font sizes for the entire document with just one or two changes to the default settings. For example, if you set the default font to 12-point Times New Roman, then the title font to 120% and the heading 1 font to 110%, then you only need to change the default font, and the font sizes for the rest of the document will automatically resize to match. The same is true for line spacing, indents, and other settings with measurable units. This should be the default for LibreOffice Writer documents. I've not seen it as an option for Google Documents.
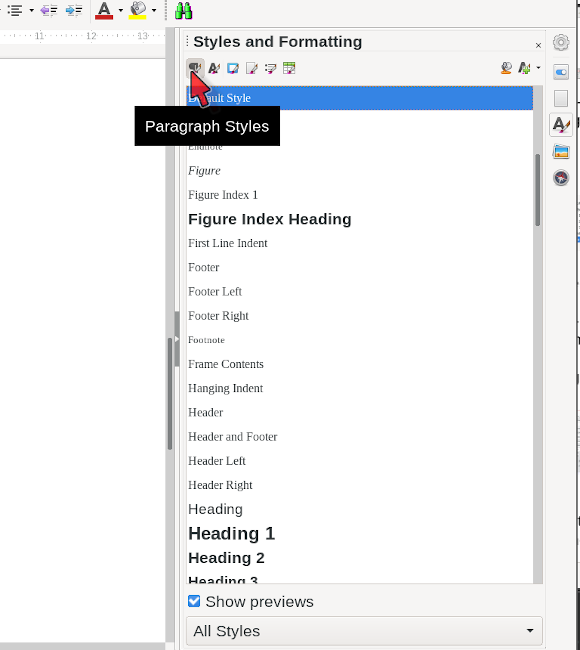
The Styles and Settings
sidebar is one reason I prefer
the way LibreOffice Writer handles styles. To open it, click
on More Styles
from the dropdown menu, or
open Styles and Formatting
directly from the sidebar on
the right side of the window. The sidebar will show you all
the styles (and offers several ways to filter them at the
bottom). In the sidebar, you can also switch between
paragraph, character, page, frame, list, and table
styles. This is why I say I think LibreOffice Writer makes
better use of styles: they make it easy to find them and use
them. The more you use styles, the easier it is to get better
formatting, more consistently.

Why Use Styles
Anyhow, back to styles. Using styles to change the formatting of paragraphs is much better than individually formatting each paragraph in a document (or using the default style for everything) because you can quickly make changes to the entire document just by updating the appropriate styles. If you have a new student who needs a different font style or size (maybe for sight-impaired or English learner students), you can change every body paragraph with one style change. Most typical classroom documents can be updated with entirely different formatting after two or three quick style updates (title, text body, and first-line indent paragraphs, usually). If you formatted paragraphs by hand, it could take considerably longer.
A basic rule of thumb is that if your document is more than one page, it is better to use paragraph styles. If it is just one page, you can probably make any changes just as quickly without bothering with styles.
The exception to that rule of thumb, though, is when you have
headings. Many teachers just manually add bold formatting to
the section titles (aka the headings). They may also manually
change the font. A sighted student can see that the paragraph
text is bold with a bit more space around it. That student can
literally see that it is a header. They probably easily
understand the meaning. But, a screen reader cannot. Screen
readers are software that students with sight difficulties use
to read
text. The software literally reads the screen
out loud. Screen readers can understand bold, but they cannot
draw conclusions about a paragraph based on the
formatting. Instead, we need to use styles to tell the screen
reader this is a heading
. Screen readers will say that
information — for example it might change voice or say
something like End section. Begin new section.
Headings
give them this information. A regular sentence with bold
formatting applied does not.
Styles offer more than just control over
formatting. Importantly, your word processor can also
use the heading information to automagically create a table of
contents and add bookmarks, so that students can easily jump
directly to the section they need. Both of these features
— table of contents and bookmarks — are bonus for
mainstream students but may be very important for some
students with special needs. And this is in addition to the
information given by the heading itself that this is a
heading
.
Be sure to learn how your preferred word processor does styles. MS Word and LibreOffice Writer handle them in some significantly different ways. MS Word, for example, will happily create a new style for you almost every time you make any changes to a style or even to a paragraph. If you are not careful, you can end up with almost every paragraph being its own style. LibreOffice Writer, in my opinion, handles styles much better, by requiring you to explicitly create a new style when you want one. That isn't very often, however, because LibreOffice Writer comes with more than 50 styles by default. Google Docs does not allow for new styles and only has about 10 generic ones — mostly headers. With Google Docs, you may have to re-purpose an unused style (like Heading 4) for a different one that they don't offer (such as Works cited).
Pedantic Tip Don't use the return / enter key to add space between paragraphs. Instead, modify the paragraph style to have space above and below it. This is also how you remove extra space. For example, APA formatting requires no extra space between paragraphs. MS Word used to (and may still) default to having 10pt of extra space below regular text paragraphs. Even with double line spacing (also an APA requirement), this extra space is easy to see, if you are aware of these things. To get rid of it, you have to modify the default paragraph style and set the space below paragraph to zero.
Using styles to control spacing between paragraphs gives you much better control over things like document length. Do you have two or three lines going to the third page, and you want to get it all on just two pages? With a full empty line between each paragraph, you can just remove a few of those and bring those last few lines back to the previous page. But, if you do this, then you now have some paragraphs with no space between them and others with a full line of space between them.
Instead, use paragraph styles to slightly decrease the amount of space between paragraphs — say from 10pt above and below to 7pt above and below. Depending on the number of paragraphs, this small tweak may be enough to bring the orphaned lines back to page two. Chances are good no one (except people like me) would even notice the difference in the spacing.
All of this is true also for line spacing within
paragraphs. If double spaced is too long, but you want as much
space between lines (in the same paragraph) as possible, try
tweaking line spacing down. Maybe from double
to proportional
at 190% or 180% (which would be 1.9 or
1.8 in Google Docs). Again, depending on how many lines of
text you have, you might save a lot of space without losing
too much space between any two lines.
Styles may not seem like a big deal, especially if you are just making worksheets and the occasional test. I am an ESOL teacher, and I create a lot of readings for my students. I use styles a lot. But, even if you are just creating quizzes and tests (for example), styles can be helpful. The most important reason is accessibility. If you have anything on the page formatted to show information (such as a title and section headings), then you will want to have it accessible when you get a student with vision issues. In USA k-12 schools, accessibility is not just a good idea, it is the law. If you get a student who needs increased font sizes, being able to change the entire document with a few style changes will be much easier and faster than trying to redo it by hand.
Accessibility aside, let's go back to quizzes and
tests. Styles are still helpful. For example, create a style
for multiple choice questions and another for
answers. Depending on the length of the test, you might even
want separate styles for the first multiple choice answer, the
last answer, and the other answers in between. This gives very
fine-tuned control over spacing, even when all the other
formatting is the same. More importantly, it also lets you
make sure that you never have one or two answer choices on
another page. Just turn on keep with next paragraph
for
the answer choice styles, but turn it off for the last answer
choice style. With this, answer choices A, B, and C will
always stay with choice D. If you want, you can set the
question style to also stay with next paragraph.
Formatting on tests and quizzes (and anything else worth points toward a grade) often does not matter, until something goes wrong, and suddenly the formatting did matter. Oops. Personally, I have seen students miss points because the final multiple choice option (the correct one!) ended up on the next page and they didn't notice it. No one wants to be that teacher, right?
You can also create styles for short answer and long answer questions. Usually, I increase the spacing and sometimes put a border on the bottom of the line, to give students a line to write on (there are better ways to do this if you plan to add scaffolding text, though). I also increase the space before and after each line (on the left and right, increasing the indent for the paragraph).
This sort of tweaking may seem time consuming. It can be, especially at first. But, once you have a document with these (for example) 3 or 4 extra styles created, you can save a copy as a template, and you never have to re-create those paragraph styles ever again.
Pro Tip: Paragraph borders are a great way to put a border around things like word banks. If you set up a word bank style, you can change the font and font size, maybe increase line spacing, increase left and right indent, set up tabs, maybe change the background color slightly, and of course add borders to a list of words very quickly — in other words, after you set up one style, you can then create fully functional word banks (or similar boxed paragraphs) quickly and easily.
In the end, even if you don't care about beautiful formatting, you probably care about accessibility and educational outcomes. Paragraph styles are one tool in your accessibility toolkit. They also make it much easier to create better materials faster. What's not to like about that?
Paragraph styles make the sort of fine-grained tweaking I talked about above easy to do to your entire document, quickly, no matter how long the document is. Often, that tweaking is the difference between a highly effective and accessible document, and a somewhat effective, not so-accessible document. Well-formatted documents improve educational outcomes — I've seen plenty of students confused by poorly-formatted, poorly-thought-out documents.
Finally, paragraph styles are just one of the ways that your word processor can do the work for you. Stop using the word processor like an advanced typewriter, and start using it more like software that processes your writing. Now that you know, look for more ways that your software can do things for you, saving you time and effort. Maybe, say, take a look at templates next?
